Budget-friendly NEW YEAR'S EVE Celebration

I've never been a big fan of getting dressed up and fighting crowds on New Year's Eve. I much prefer smaller (and more casual) gatherings... especially now that I have kids. Home parties with tons of fun DIY details are my favourite... so today, I am sharing some of my favourite New Year's Eve DIY ideas that will help you ring in the New Year in style... and on a budget. 


Don't you love this simple New Year's Eve tablescape? It includes dollar store decor, midnight kisses, treats to "ring" in the new year, a way to add sparkle to the festivities, and activity bags for kids. 


My best tip for New Year's Eve decor is to use leftover gold and silver Christmas decor. Look for cheap silver and gold garlands, silver and gold tablecloths, and silver and gold serving trays and dishes. White Christmas lights work well too. 


And if you are looking for ways to keep kids entertained, consider putting together New Year's Eve activity bags. Fill several bags with different treats and activities, and let the kids open a new bag every hour. (For some ideas on items to include in the bags, you can click here.)


Party food is also important. It's simple to transform store-bought fortune cookies into custom creations. Simply dip the cookies in melted chocolate and sprinkles, and let them set on a piece of wax paper. It doesn't get much easier!


Cookies and milk in wine glasses is also fun. I love that kids can take part in a midnight toast with the adults.


And don't forget to hand out party favours to your guests. I love these "Bring some sparkle to 2022" cards for sparklers. Print the cards (for free) below, cut slits in the cards, and insert sparklers. 


To print the sparkler card: click on the photo below, right-click, save it to your computer, and print it like a regular 4x6 photo.


"Midnight Kisses" also make adorable party favours. Fill plastic wine glasses with Hershey kisses, and package them with noisemakers. I put mine in clear bags and added a "midnight kisses" tags with some curling ribbon.


To download the "Midnight Kisses" tag I designed: click on the photo below, right-click, save it to your computer, and print it like a regular 4x6 photo.


And kids will LOVE candy rings packaged with "ring in the New Year" tags.


To download the "Ring in the New Year" tag I designed: click on the photo below, right-click, save it to your computer, and print it like a regular 4x6 photo.


When all these DIY details come together, you end up with a table that is packed with fun... and full of style.


These simple tips, tricks and free printables are perfect for a DIY New Year's Eve party at home. Adults and kids will both be impressed with all the fun details.

Happy New Year!

Gina Bell

(Mom and Amateur Party Planner)


PS (I love getting the kids to fill out a year in review questionnaire too. You can download a copy of the one I designed, for free, here.)

Simple Holiday Movie Night

Holiday movie nights are perfect for celebrating Christmas with family and friends. All you need is a good movie and a few simple movie-themed snacks and decorations. 


First, you'll need a good Christmas movie. This checklist contains 15 of my favourites. For older audiences, Die Hard, Love Actually, and The Holiday are wonderful choices.


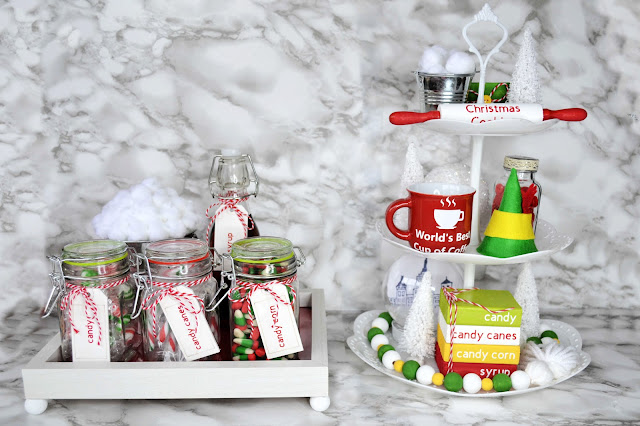
Then, you'll need some great movie snacks. You can go with a red and green colour scheme or get inspiration from the movie. For Elf, I set up an "elf food group" candy bar. I had: candy, candy canes, candy corn, and syrup.


A cookie bar is another fun idea. You can fill it with homemade goodies, but store bought cookies are impressive too.


And don't forget to add a bit of movie-themed decor. I made a fun tiered tray for our Elf movie night using dollar store supplies. Cute, right?!?


You can see how I made it here...


Are you planning a holiday movie night this year? It's definitely an easy, inexpensive and fun way to celebrate with family and friends.

Gina Bell

(Mom and Amateur Party Planner)


You might also be interested in the holiday celebration ideas here.

Thanksgiving Party Favours

Every party needs a good gift for guests to take home, and I am in love with these adorable Thanksgiving party favours. Today, I'm sharing an option for adults, something for the kids, and FREE printable tags. Fun, right?!?!


Both of these favours start out with a fantastic seasonal cookie recipe. These soft and chewy ginger cookies, smell great and taste delicious. You can find the recipe here.


After the cookies have cooled, you can put them in a clear cellophane bag, and add the cute tag I designed. Click on the photo below, right-click, save it to your computer, and print it like a regular 4x6 photo.

Trim it to look like a gift tag, and tie it to a bag of cookies.


These really are the sweetest little "take away" for your adult Thanksgiving guests.


For the kids, why not make these adorable turkey cookies. Put one of the ginger cookies in a bag, tape a faux Fall leave to the back, add a cardstock beak and wattle, and glue on some large googly eyes.

That's it! What kid wouldn't love taking one of these sweet cookies home after Thanksgiving dinner.


These Thanksgiving party favours are perfect for small dinners and large gatherings... and they are easy and inexpensive to make.


What do you think of these Thanksgiving party favours? Do you think you will share these tasty treats with your guests this year?

Gina Bell

(Mom and Amateur Party Planner)


You might also be interested in the holiday celebration ideas here.

Simple Personalized Party Banner... for less than $2

Personal touches are what make a party unique, and they are even more impressive when you can DIY them on budget. I love the idea of creating a photo banner to use as DIY party decor. It's easy, inexpensive, and fun.


I like to make a banner using a combination of photos of the person being celebrated, and photos designed to co-ordinate with the party theme. Then, I print the photos, use a hole punch to put holes in the photos, and string the photos on a thick piece of jute cord. It's that easy!!!!


For the design element, I create a 4x6 image that fits with the party theme. Here are two examples that I designed for my boys golf and hockey parties.


The photo banners can be used anywhere. I hung one in my trunk when I hosted a mini golf party. We had a round of mini golf, and then we had a "19th hole" celebration in the parking lot.


I also love a banner hung behind a "treat table". It adds a touch of fun to the decor.


What do you think? Isn't this a fantastic way to add an inexpensive, personalized touch to a party? I can't think of a better way to spend $2, can you? I absolutely love this DIY party decor!


Gina Bell
(Mom and Amateur Party Planner)


DIY "Serve Yourself Lemonade Tray"... made using dollar store supplies

Celebrating summer with simple decor and fun food is a fantastic idea... especially when you can do it on a budget. One fun option to create a "serve yourself" DIY lemonade tray using dollar store supplies. Keep reading to see how easy and inexpensive it is to create!


The first step is to insert a colourful piece of paper into a wooden frame from the dollar store.


Then, use a combination of hot glue and wood glue to attach large wood beads to the bottom of the frame. (I painted mine with white chalk paint, but you can leave them plain if you want.)


I also used some glue to secure the back of the frame in place.


Once the glue dried, I filled the tray with goodies. I included: a dollar store lemonade pitcher, a dollar store lemonade glass, a jar filled with yellow and orange candies, some wooden beads, a lemonade slice decoration (made from scraps of felt), and some lemonade mix.


Tip: To add some colour to the tray, use painters tape and spray paint to create a yellow lid for the candy jar.


And... you can display the tray with this adorable "lemonade" picture. You can download it for free here.


Seriously... isn't this cute? This is such a simple idea, and it's sure to be a hit with family and friends. My kids are loving it! If you make a DIY "serve yourself lemonade tray", let me know how it turns out.


Gina Bell
(Mom and Amateur Party Planner)


DIY Pom Pom Cupcake Garland

Every celebration needs cute party decor, and this DIY pom pom cupcake garland is absolutely adorable. It's perfect for a birthday party or baby shower, and it would be wonderful as a photo booth backdrop too. It's easy, inexpensive, and fun to make... and I'm sharing the full step-by-step instructions below.


The first step is to make a bunch of pom poms. The number of pom poms you need depends on how long you need your garland to be. I suggest a minimum of 5.


To make simple pom poms. Wrap yarn around your fingers or a piece of cardboard approximately 60-80 times (not too tightly), slip the yarn off your fingers and tie it in the middle, cut the loops, and trim to shape. It's that easy! 

(You can also find a helpful video here.)


Then: use hot glue to attach cupcake liners to the bottoms of the pom poms, use hot glue to add "cherry" pom poms to the tops, and trim as desired.

To turn the cupcakes into a garland, simply string embroidery floss through the "cherry" pom poms.


Isn't this garland sweet?


DIY party decor is wonderful, inexpensive, and totally unique, and this pom pom garland is perfect for any party. If you give this craft a try, let me know what you think.


Gina Bell
(Mom and Amateur Party Planner)

Simple Easter "Bunny Bar"... with free printable sign

Putting together a self-serve "Bunny Bar" is an excellent Easter entertaining idea. It's simple, inexpensive, and fun! Below, I'm sharing recipes, DIYs, and a free printable sign... that are guaranteed to let you impress your guests (with very little effort). 


The best thing about a bunny bar, is that you can use whatever you want. And, the free sign I designed will help you pull all the elements together. I printed mine at my local photo lab, and I popped it in a $2 frame from the Dollar Store.

To download the sign I designed: click on the picture below, right-click, save it to your computer, and print it like a regular 8x10 photo.


One option for setting up your bunny bar is to include hot chocolate, bunny tails (mini marshmallows), and bunny kisses (chocolate kisses).


Homemade cookies are a wonderful addition too. These "bird nest cookies" are my all time favourite Easter treat. You can check out the recipe here.


Another option is to embellish dollar store jars and add Easter treats. Below, I filled jars with cookies, marshmallows, hot chocolate, candy coated chocolate mini eggs, and chocolate carrots.


For example, I hot glued some ribbon around the mouth of a jar, hot glued a dollar store plastic bunny to the top, and filled it with foiled covered carrots. Isn't it sweet?


A hot chocolate bar is an excellent addition to any Easter celebration... small or large. And I encourage you to try out a few Easter DIYs to add to your display. Let me know how it goes, and Happy Easter!


Gina Bell
(Mom and Amateur Party Planner)


DIY St.Patrick's Day Hot Chocolate Bar... using dollar store supplies

Who doesn't love a simple holiday celebration? And setting up a hot chocolate bar is the perfect way to add some fun to a St.Patrick's Day party... or a day at home with family. To set up an easy and inexpensive St. Patrick's Day hot chocolate bar, all you need are a few dollar store supplies, and the information below.


I had a bunch of empty mason jars. Then, I picked up: a dollar store shamrock necklace, black paint, gold chocolate coins, and Skittles.


I decided that I needed a "pot of gold", so I painted a small mason jar black.


Then, I cut up the St.Patrick's Day necklace. I used hot glue to attach one of the Shamrocks to the front of the black pot, and I set the others aside to be used later.


I filled the finished "pot of gold" with chocolate gold coins. Cute, right? I absolutely love how it turned out!


Then, I grabbed the mason jars (I already had), and added: cookies, mini marshmallows, rainbow covered Skittles, and hot chocolate mix. I attached the charms I made using the dollar store necklace... and voila! I absolutely LOVE how it turned it. 

It is festive and fun... and it was super easy and inexpensive to put together.


I hope I've inspired you to put a simple St. Patrick's Day hot chocolate bar together for your family and friends. It really is a super easy project, and its lots of fun.

Happy St. Patrick's Day!


Gina Bell
(Mom and Amateur Party Planner)


You might also be interested in these fun ideas.

DIY Valentine's Day Hot Chocolate Bar

Little DIY details are what make holiday celebrations special... and hot chocolate bars are a wonderful way to add a little fun to a party. They are also fantastic for quiet get togethers at home with family and friends. Today, I'm sharing how EASY it is to create a DIY Valentine's Day Hot Chocolate Bar using simple (and cheap!) dollar store supplies.


I started by repurposing some mason jars that I used to make a hot chocolate bar at Christmas.


Then, I headed to the dollar store to pick up a few inexpensive supplies. I purchased: red mugs with heart-shaped handles, heart-shaped dishes for candy and chocolates, heart-shaped felt embellishments to replace the bells on the mason jars, and wafer cookies.


I filled the jars, attached the heart-shaped embellishments with twine, filled the dishes with chocolates, and made some hot chocolate. Cute, right?


You can leave the hot chocolate bar plain...


Or you can add some handcrafted decor to your display to make it a little more special.


I wrapped a milk bottle in twine (securing periodically with hot glue) to create a vase, and I filled the vase with pom poms and cardboard hearts covered with yarn.

I also made an adorable gnome from dollar store socks and a dollar store mop. You can find the full step by step tutorial for the gnome here.


A hot chocolate bar is an excellent addition to any Valentine's Day celebration... small or large. And I encourage you to try out a few Valentine's Day crafts to add to your display. Let me know how it goes, and Happy Valentine's Day!


Gina Bell
(Mom and Amateur Party Planner)


If you are looking for more Valentine's Day inspiration, check out more than 30 Valentine's Day ideas here.